# Understanding Mold Remediation Challenges in Palm Bay After Heavy Rainstorms Palm Bay, Florida, is no stranger to heavy rainstorms and the occasional hurricane. While many homeowners focus on cleaning up visible water, **mold growth is often the hidden and more persistent consequence** of these events. Even a single storm can leave moisture trapped in walls, floors, attics, or crawl spaces, creating the perfect environment for mold colonization. Understanding the challenges of mold remediation after heavy rainfall is crucial for protecting your home, health, and long-term property value. This article explores why mold develops quickly in Palm Bay homes, common challenges during remediation, signs that mold is present, and strategies for effective, lasting mold control. — ## Why Mold Becomes a Problem After Heavy Rainstorms Heavy rainstorms increase the **risk of water intrusion** in Palm Bay homes. Factors that contribute to mold problems include: * **Flooding or water seepage** from exterior walls, basements, or crawl spaces * **Roof leaks or damaged gutters**, allowing water to penetrate ceilings and walls * **High indoor humidity**, which often lingers for days after storms * **AC condensation issues**, which worsen moisture buildup in homes * **Older construction materials**, such as wood framing and plaster, which absorb water Even when standing water is removed quickly, moisture can remain trapped in structural materials, leading to **hidden mold growth**. — ## Common Challenges in Mold Remediation After Storms Mold remediation in Palm Bay homes after heavy rainstorms presents several unique challenges: ### 1. Hidden Moisture * Mold often grows in **wall cavities, under flooring, and in attics or crawl spaces**, where it is not visible. * Homeowners may assume the home is dry once visible water is removed, leaving mold colonies to expand. ### 2. High Humidity and Warm Temperatures * Florida’s high humidity and warm climate accelerate mold growth. * Even short-term moisture exposure can result in colonies forming within 24–48 hours. ### 3. Structural Complications * Older homes may have multiple layers of drywall, plaster, or subflooring, making complete moisture removal difficult. * Improper removal or drying can leave pockets of dampness, causing mold to recur. ### 4. Post-Storm Contaminants * Stormwater can carry bacteria, debris, and other contaminants, complicating mold remediation. * Contaminated areas require careful containment and specialized cleaning techniques. ### 5. Inaccessible Areas * Crawl spaces, attics, and wall cavities can be hard to access, slowing down remediation. * Professional tools like air movers, dehumidifiers, and thermal imaging are often required to locate and remove mold effectively. — ## Warning Signs of Mold After a Storm Homeowners should be aware of **early indicators** that mold may be developing: * **Musty or earthy odors**, especially in enclosed spaces * **Visible mold growth**, which can appear as black, green, or white spots * **Warping or bubbling of walls, flooring, or ceilings** * **Stains or discoloration** on wood, drywall, or paint * **Health symptoms**, such as sneezing, coughing, or irritation, triggered indoors Recognizing these signs early allows homeowners to address the problem **before it becomes widespread and more costly**. — ## Steps Involved in Professional Mold Remediation Mold remediation after heavy rainstorms is a multi-step process designed to **safely remove mold and prevent recurrence**: ### Step 1: Inspection and Assessment * Professionals inspect the home for visible and hidden mold using moisture meters, thermal imaging, and visual checks. * They assess the extent of water damage and identify areas needing containment. ### Step 2: Containment * Affected areas are sealed using plastic barriers to prevent mold spores from spreading to other parts of the home. * Negative air pressure systems may be employed to maintain a clean environment. ### Step 3: Removal of Mold-Infested Materials * Porous materials like drywall, insulation, and carpeting may need to be removed and safely disposed of. * Non-porous surfaces are cleaned using specialized anti-microbial solutions. ### Step 4: Air Scrubbing * Air scrubbers with HEPA filters remove airborne mold spores and contaminants. * This step ensures that spores do not settle on previously unaffected surfaces. ### Step 5: Structural Drying * Industrial air movers and dehumidifiers accelerate the drying process. * Thorough drying prevents mold from returning, even in hidden areas like crawl spaces or behind walls. ### Step 6: Anti-Microbial Treatment * Surfaces may be treated with anti-microbial solutions to inhibit mold regrowth. * Fogging may be used in hard-to-reach areas for deeper protection. ### Step 7: Prevention and Maintenance * Homeowners are advised on **ventilation improvements, moisture monitoring, and AC maintenance** to prevent future mold growth. * Routine inspections after storms are critical in coastal Florida homes. — ## Mistakes Homeowners Commonly Make 1. **Attempting DIY mold removal** without addressing hidden moisture 2. **Using bleach or surface cleaners**, which do not remove mold roots 3. **Ignoring minor leaks** or dampness after a storm 4. **Failing to dry structural components** thoroughly 5. **Skipping post-storm inspections**, allowing small mold issues to escalate These mistakes often lead to **recurring mold problems** and higher remediation costs. — ## Why Quick Action Matters * Mold spreads rapidly, especially in high-humidity environments. * Delaying remediation can lead to **more extensive damage to wood, drywall, and flooring**. * Quick professional intervention limits **structural damage, health risks, and repair costs**. * Early remediation allows homes to return to a **safe and comfortable living environment** sooner. — ## Cost and Time Considerations * Professional mold remediation has upfront costs but **prevents larger, more expensive problems** in the future. * Early action reduces the need for structural repairs, complete drywall replacement, or flooring replacement. * Faster response also limits **property disruption**, helping homeowners resume normal use of their homes quickly. — ## The Role of Local Expertise Local professionals, such as Inspections and More FL, bring invaluable knowledge to mold remediation in Palm Bay: * Familiarity with **coastal humidity and storm patterns** * Expertise in **older and mixed-construction homes** * Skilled in using **thermal imaging, moisture meters, air scrubbers, and dehumidifiers** * Ability to implement **long-term preventive strategies** tailored to Florida’s climate Local experience ensures remediation is **accurate, efficient, and effective**, minimizing the risk of recurrence. — ## Long-Term Mold Prevention Strategies * **Maintain roof, gutters, and flashing** to prevent leaks * **Inspect and clean AC systems** to prevent condensation buildup * **Install or improve ventilation** in attics, crawl spaces, and basements * **Use dehumidifiers** during humid months * **Perform post-storm inspections** to catch water intrusion early * **Monitor indoor humidity** with hygrometers to keep levels between 45–55% By integrating these strategies with prompt remediation, homeowners can **protect both their property and health**. — ## Conclusion Heavy rainstorms in Palm Bay create conditions for **rapid mold growth** in homes. Damp air, hidden water intrusion, and structural moisture all contribute to persistent mold problems that can threaten both **indoor air quality and building integrity**. Professional mold remediation, combined with **structural drying, air scrubbing, and long-term moisture control**, is essential to address these challenges effectively. Quick action, local expertise, and proper equipment ensure that Palm Bay homes are **safe, dry, and resilient** even after Florida’s heaviest storms. — I can generate **3 free-use, license-free images** showing mold remediation in Palm Bay homes after heavy rainstorms, including air scrubbing, structural drying, and thermal imaging inspections. Do you want me to create these images next?

Why Air Blower Installation Becomes Necessary in Cocoa Under Hardwood Flooring

In Cocoa, hardwood flooring is a popular choice among homeowners for its aesthetic appeal and durability. However, Florida’s humid subtropical climate, frequent rainstorms, and coastal proximity make it vulnerable to hidden moisture problems. Even minor leaks or AC condensation can allow water to seep under hardwood planks, leading to warping, mold growth, and structural damage.

One of the most effective solutions for addressing moisture beneath hardwood floors is air blower installation. Proper air circulation ensures thorough drying, prevents long-term damage, and protects indoor air quality. This article explains why air blowers are necessary under hardwood flooring in Cocoa homes, the challenges homeowners face, and best practices for effective installation.


Understanding the Risks Under Hardwood Flooring

Hardwood flooring is porous and can absorb water, while the subflooring and adhesives beneath can trap moisture. Common sources of moisture under hardwood include:

  • Stormwater intrusion from heavy rain or minor flooding
  • Plumbing leaks, including pipes running beneath floors
  • AC condensation, especially in older or poorly maintained systems
  • High humidity, which can accumulate under flooring if ventilation is inadequate

Even when the surface appears dry, trapped water can persist beneath the planks, creating hidden damage over time.


Why Air Blowers Are Essential

Air blowers, or industrial-grade air movers, are designed to increase airflow under floors and accelerate the drying process. Their importance under hardwood flooring cannot be overstated:

1. Preventing Warping and Buckling

  • Water trapped under hardwood planks causes wood to swell and warp, compromising structural integrity.
  • Air blowers circulate air, promoting evaporation and restoring the floor to its original shape.

2. Avoiding Mold and Mildew

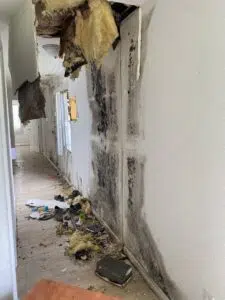
  • Mold can develop within 24–48 hours in warm, damp environments.
  • Trapped moisture under flooring is a common hotspot for microbial growth.
  • Air blowers maintain airflow, keeping surfaces and subflooring dry and mold-free.

3. Protecting Subfloor Integrity

  • Plywood, particleboard, or concrete subfloors absorb water, potentially weakening the structure.
  • Proper drying ensures subfloors retain strength and stability.

4. Enhancing Indoor Air Quality

  • Stagnant moisture beneath floors can release spores and allergens into living spaces.
  • Air blowers, combined with dehumidifiers and air scrubbing, reduce airborne contaminants.

Common Challenges in Cocoa Homes

Cocoa’s local climate and typical construction methods create specific challenges for drying hardwood floors:

High Humidity

  • Coastal humidity often exceeds 70% in summer, slowing natural drying.
  • Without forced airflow, trapped moisture may persist for weeks.

Older Homes and Materials

  • Many Cocoa homes have older hardwood floors over plywood or concrete subfloors.
  • Older materials absorb water more readily and dry less efficiently.

Hidden Moisture

  • Water may remain beneath the flooring, adhesives, and underlayment, invisible to the naked eye.
  • Surface drying alone is insufficient to address deep structural moisture.

Post-Storm Water

  • Even minimal flooding can allow water to seep under baseboards or hardwood seams.
  • Trapped water under planks expands when humid air is present, accelerating damage.

Signs That Air Blower Installation Is Needed

Homeowners should consider air blower use if they notice:

  • Warping, buckling, or cupping of hardwood planks
  • Musty or damp odors near flooring
  • Persistent humidity in living areas despite AC or ventilation
  • Water stains along baseboards or near seams
  • Slow drying after minor leaks or storm events

Early detection and rapid intervention prevent further damage and limit the need for costly floor replacement.


Air Blower Installation Process Under Hardwood Flooring

Proper installation ensures even, efficient drying and prevents additional issues. The process typically involves:

Step 1: Inspection and Moisture Mapping

  • Technicians inspect the floor, subfloor, and surrounding areas.
  • Moisture meters and thermal imaging detect hidden damp spots beneath planks.

Step 2: Floor Lifting or Gap Creation

  • In some cases, small gaps are carefully created between planks to allow airflow.
  • Floorboards may be partially lifted to target highly saturated areas.

Step 3: Air Blower Placement

  • Industrial air movers are positioned strategically under or around affected areas.
  • Airflow is directed to cover all damp zones for thorough drying.

Step 4: Integration with Dehumidifiers

  • Air blowers circulate humid air toward dehumidifiers.
  • Continuous removal of moisture from both the air and subflooring accelerates drying.

Step 5: Monitoring and Adjustment

  • Moisture levels are monitored daily.
  • Blower positions may be adjusted to address stubborn moisture pockets.

Step 6: Completion and Final Inspection

  • Once subfloor and hardwood planks are fully dry, equipment is removed.
  • Final inspection ensures floors are stable, dry, and free of mold.

Mistakes Homeowners Often Make

  • Relying solely on fans or AC for drying, which is ineffective under floors
  • Delaying air blower installation, allowing warping or mold growth to progress
  • Ignoring hidden moisture, focusing only on visible water
  • Stopping drying prematurely, leaving subflooring damp

These mistakes can lead to recurring moisture problems, structural damage, and mold remediation costs.


Long-Term Prevention Strategies

Proper air blower use is only one part of protecting hardwood flooring. Long-term strategies include:

  1. Prompt Water Removal
    • Address leaks and flooding quickly to minimize moisture penetration.
  2. AC Maintenance and Ventilation
    • Ensure proper airflow and condensation management under flooring.
  3. Humidity Control
    • Use dehumidifiers during high-humidity months to prevent trapped moisture.
  4. Routine Inspections
    • Periodically check for warping, odors, or hidden water under baseboards and seams.
  5. Post-Storm Checks
    • After heavy rain, inspect flooring and subflooring for hidden moisture and act quickly if detected.

Benefits of Professional Expertise

Hiring local professionals, such as Inspections and More FL, ensures:

  • Accurate detection of moisture using thermal imaging and moisture meters
  • Proper air blower placement and airflow direction
  • Integration with dehumidifiers and air scrubbing for complete drying
  • Guidance on preventive strategies to reduce future moisture problems

Local knowledge is essential in Cocoa, where humidity, storms, and older construction make moisture challenges unique.


Cost and Time Considerations

  • Professional air blower installation prevents extensive floor replacement and mold remediation.
  • Upfront investment saves homeowners money by limiting structural damage and recurring issues.
  • Effective drying allows families to resume normal home use faster without health risks or structural compromise.

Conclusion

Hardwood floors in Cocoa homes are beautiful but vulnerable to hidden moisture beneath planks, especially after storms or leaks. Air blower installation is a critical step in ensuring thorough drying, preventing warping, mold growth, and structural damage.

By combining professional air blower use with dehumidification, post-storm inspections, and humidity control, homeowners can protect their hardwood flooring, indoor air quality, and overall property value. Acting quickly after moisture exposure is key—delays can lead to long-term damage that is much more costly to repair.

If you need a residential mold remediation company in Cocoa, FL or surrounding areas, look no further than Inspections & More. We’re a local, owner-operated business with prior law enforcement and military experience.

Copyright 2025 © Inspections & More FL | All Right Reserved