Cocoa Homes Dealing with Structural Dryouts After Heavy Rainstorms — A Step-by-Step Explanation
Florida homeowners know that heavy rainstorms can be more than just a nuisance—they can damage the very structure of a home. In Cocoa, where tropical storms and seasonal rain are frequent, water intrusion into homes can lead to moisture trapped in subfloors, walls, crawl spaces, and attics. If left unaddressed, this moisture can degrade structural components, promote mold growth, and compromise indoor air quality.
This is where structural dryouts come in. Structural dryout is a professional process that restores moisture-saturated building materials to safe levels, protecting both the property and its occupants. Understanding this process step by step helps homeowners and property managers know what to expect and why each step is critical for long-term home safety.
Why Structural Dryouts Are Essential After Heavy Rainstorms
Heavy rainstorms introduce water into homes in several ways:
- Roof leaks due to storm damage or aging materials
- Flooding from heavy rainfall or poor site drainage
- Window and door breaches during high wind and rain
- Seepage through slab edges or foundation cracks
When water infiltrates structural materials like wood, drywall, and subflooring, it often remains trapped, creating an environment ripe for mold, wood rot, and material degradation. Structural dryouts address the root problem by safely removing this trapped moisture.
Step 1: Initial Assessment and Inspection
The first step is assessing the damage to determine the severity and scope of moisture intrusion.
Visual Inspection
- Inspect ceilings, walls, and floors for visible water stains or buckling
- Check crawl spaces, basements, or slab edges for pooling water
- Look for signs of mold or mildew
Advanced Moisture Detection
Because water can penetrate hidden areas, professionals often use:
- Moisture meters to measure dampness in wood, drywall, or concrete
- Thermal imaging cameras to detect hidden wet spots
- Hygrometers to assess humidity levels in rooms and enclosed spaces
The combination of visual and technological inspection helps create a precise plan for structural drying.
Step 2: Identifying and Eliminating Moisture Sources
Structural drying cannot succeed if the source of water is still active.
Common Water Sources After Storms
- Roof leaks from missing shingles or flashing damage
- Foundation seepage due to heavy rainfall or poor grading
- Plumbing line breaks exacerbated by storm pressure
- Floodwater ingress through doors, windows, or vents
Once identified, these sources are repaired or mitigated. This prevents ongoing saturation during the drying process.
Step 3: Containment and Safety Measures
Before structural dryout begins, professionals protect unaffected areas and ensure safety:
- Containment barriers may be installed to prevent cross-contamination from mold spores
- Protective coverings shield furniture or flooring
- Electrical systems are inspected if water has contacted outlets or wiring
This step ensures both effective drying and safe working conditions.
Step 4: Removing Excess Water
If standing water remains after a storm, it must be removed before drying.
Common Water Removal Methods
- Submersible pumps for deep pooling in basements or crawl spaces
- Wet/dry vacuums for shallow water on floors
- Mopping and absorbent materials for minor surface water
The goal is to reduce saturation levels to a manageable state before using drying equipment.
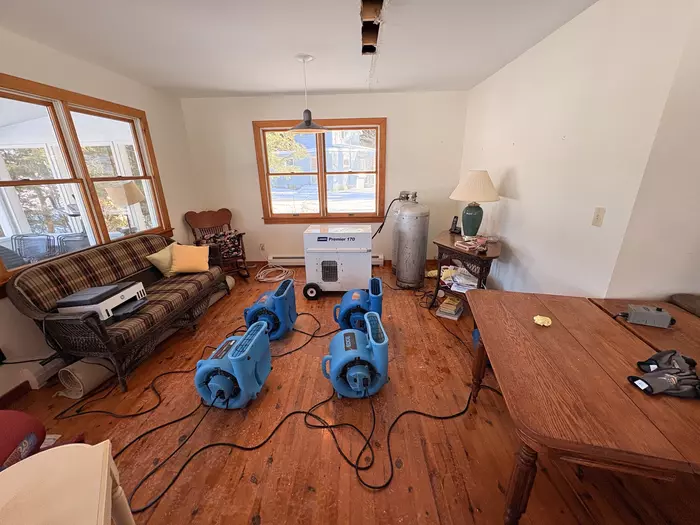
Step 5: Structural Drying Setup
Once standing water is removed, structural dryout focuses on evaporation and moisture extraction.
Equipment Used
- Industrial air movers: increase airflow across wet surfaces
- High-capacity dehumidifiers: remove moisture from the air, accelerating drying of materials
- Ducting and containment systems: direct airflow into specific areas like crawl spaces or wall cavities
Targeted Drying
Air movers and dehumidifiers are positioned strategically to reach:
- Wet drywall or sheetrock
- Subflooring and wooden joists
- Crawl space surfaces
- Attic insulation and decking
Monitoring ensures that all areas are drying uniformly, preventing hidden wet spots that could cause mold.
Step 6: Monitoring Progress
Effective structural drying is not instant—it requires continuous monitoring.
- Moisture readings are taken daily with meters and probes
- Humidity and temperature are tracked to optimize evaporation
- Equipment placement may be adjusted based on readings
Monitoring ensures that materials reach safe moisture levels, which vary depending on the material type (wood, concrete, drywall).
Step 7: Post-Drying Evaluation
After materials are considered dry:
- Professionals verify moisture content is within safe thresholds
- Thermal imaging may be used to confirm that hidden wet spots are eliminated
- Any remaining minor damp areas are addressed before finishing work
This evaluation ensures the home is ready for the next steps, such as repairs or mold remediation if needed.
Step 8: Preventing Mold and Future Damage
Once structural dryout is complete, preventative measures help protect the home:
- Dehumidifiers installed in problem areas maintain safe indoor humidity
- Improved ventilation in crawl spaces, attics, or basements
- Exterior grading or drainage adjustments to prevent water intrusion
- HVAC system maintenance to avoid condensation buildup
These steps reduce the likelihood of recurring moisture problems and mold growth.
Common Challenges During Structural Dryouts in Cocoa Homes
Hidden Moisture Pockets
Stormwater can penetrate walls, insulation, and subfloors, creating inaccessible wet areas that require specialized equipment.
High Ambient Humidity
Cocoa’s humid environment slows evaporation. Professionals must account for ambient conditions when setting up drying systems.
Material Sensitivity
Different materials dry at different rates. For example:
- Wood absorbs water and dries slowly
- Drywall may delaminate if dried too quickly
- Concrete holds moisture and requires extended drying periods
Understanding these differences is crucial for a successful dryout.
Why Professional Expertise Matters
Attempting structural dryouts without professional guidance can result in:
- Incomplete drying leading to mold growth
- Structural weakening due to prolonged moisture
- Inefficient equipment use prolonging recovery time
- Hidden water pockets going undetected
Experienced professionals, like those at Inspections and More FL, understand Cocoa’s unique climate and building types, ensuring proper drying and long-term protection.
Step 9: Restoration and Repair
After drying is complete:
- Damaged drywall, flooring, or insulation is replaced
- Structural components weakened by water are repaired or reinforced
- Cosmetic finishes are restored
At this stage, the home is not only dry but structurally secure and safe from mold.
Step 10: Long-Term Monitoring and Maintenance
Even after structural dryout, regular monitoring helps prevent future problems:
- Periodic moisture checks in subfloors and crawl spaces
- Routine inspection of roofs and gutters before storm season
- Maintaining proper ventilation and dehumidification systems
- Post-storm inspections for early detection of leaks
This proactive approach protects property investment and indoor air quality.
Final Thoughts
Heavy rainstorms are a fact of life in Cocoa, but their impact doesn’t have to be catastrophic. Structural dryouts are a critical step in maintaining home safety, preserving structural integrity, and preventing mold. By understanding the process—from inspection to monitoring—homeowners can ensure that their properties recover effectively and are protected against future water intrusion.
With Cocoa’s humid and storm-prone climate, professional structural dryouts provide peace of mind and long-term protection for families, landlords, and property managers.