Mold Encapsulation in Sanford Inside Attic Spaces: Long-Term Protection Strategies
Attics in Sanford homes are often overlooked—but they play a crucial role in overall home health. Due to Florida’s high humidity, storm season, and variable temperatures, attics are prime locations for moisture accumulation and mold growth. While professional inspections and remediation can remove mold effectively, one of the key strategies for long-term protection is mold encapsulation.
Mold encapsulation involves applying specialized coatings that seal and contain residual mold spores after remediation. This prevents spores from spreading, reduces the risk of regrowth, and protects structural components. In attic spaces, proper encapsulation requires careful planning, moisture management, and a clear understanding of both environmental factors and building construction.
This article will explore the challenges, strategies, and best practices for attic mold encapsulation in Sanford homes, focusing on long-term protection for property owners.
Why Attic Mold Is a Common Problem in Sanford
Sanford’s climate creates a near-perfect environment for mold development in attics:
- High humidity year-round accelerates condensation
- Storms and heavy rainfall increase roof leaks and water intrusion
- Poor ventilation in older or modified attics traps warm, moist air
- HVAC systems may contribute to condensation if ducts are improperly insulated
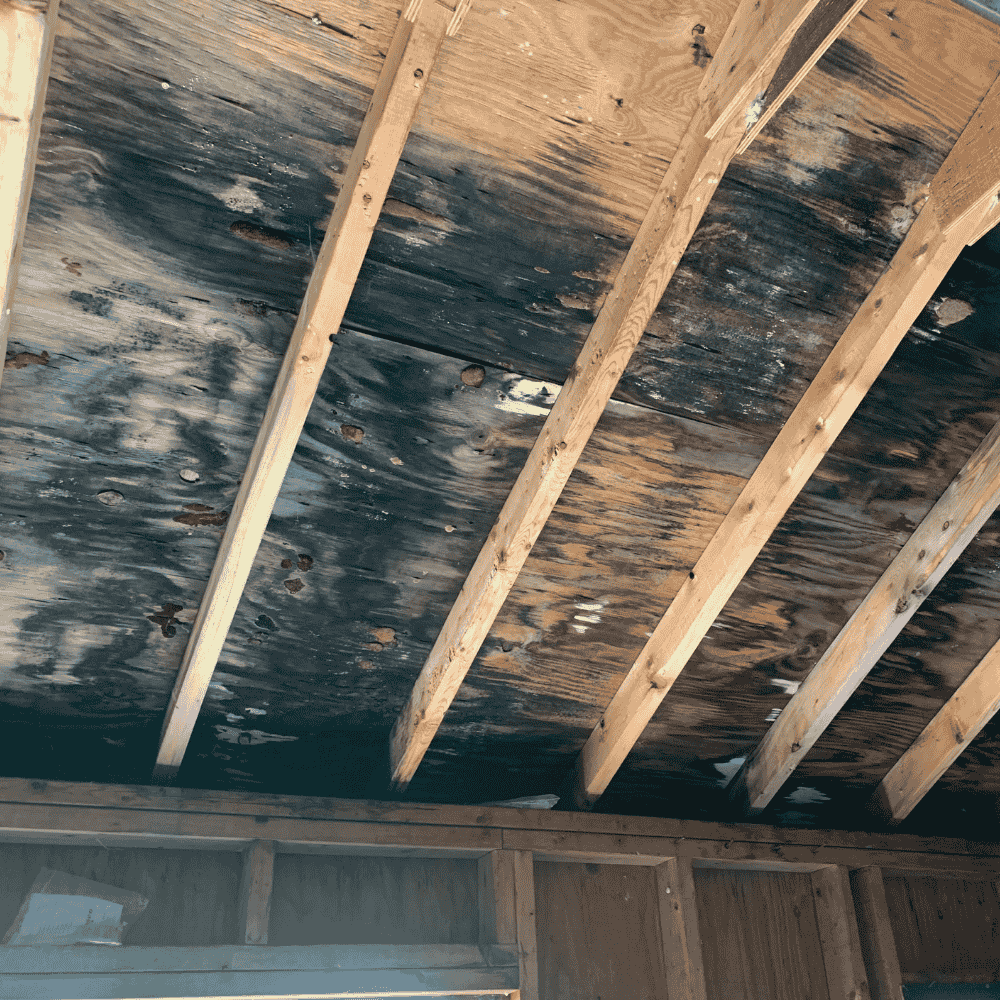
Attic mold often starts on:
- Roof decking and trusses
- Insulation surfaces
- Framing cavities
- Air handler areas
If left untreated, mold can damage structural components, reduce indoor air quality, and eventually affect living areas below.
What Mold Encapsulation Achieves
Mold encapsulation is not a substitute for removal; it is a complementary strategy used after mold has been properly remediated. Its goals include:
- Sealing residual spores: Encapsulation prevents any remaining spores from becoming airborne.
- Protecting surfaces: It coats wood and other materials to reduce moisture penetration.
- Reducing future growth: Encapsulated surfaces are less hospitable to mold if minor moisture events occur.
In attic spaces, this is particularly valuable because mold growth is often hidden behind insulation, rafters, and drywall edges.
Key Challenges of Mold Encapsulation in Attics
Encapsulating mold in attics comes with several specific challenges:
1. Hidden Moisture Sources
Even after remediation, residual moisture may linger in:
- Insulation layers
- Wood framing near roof edges
- HVAC duct areas
If these areas are not fully dry, encapsulation will trap active mold, leading to future regrowth.
2. Attic Accessibility
Attics are often cramped or difficult to navigate, making:
- Proper surface cleaning difficult
- Uniform application of encapsulant challenging
- Comprehensive inspection harder
Professionals must use ladders, platforms, or specialized tools to ensure even coverage.
3. Environmental Conditions
High attic humidity, heat, and airflow in Sanford can affect encapsulant adhesion. Proper drying and environmental control are necessary before application.
4. Multiple Materials
Attic spaces may contain:
- Wood framing
- Plywood decking
- Fiberglass insulation
- HVAC components
Different materials require different preparation and coatings to ensure effective encapsulation.
Step-by-Step Mold Encapsulation Process in Attic Spaces
Step 1: Comprehensive Inspection
Before encapsulation:
- Visual inspection for remaining mold
- Moisture detection using meters and thermal imaging
- Assessment of attic ventilation and HVAC contributions
The goal is to identify all areas needing treatment and ensure moisture is addressed.
Step 2: Moisture Correction
Encapsulation will fail if moisture remains. Professionals often:
- Repair roof leaks
- Insulate or seal ducts
- Improve ventilation with soffit or ridge vents
- Install temporary dehumidifiers if needed
Drying substrates to safe moisture levels is critical.
Step 3: Surface Preparation
Encapsulation requires clean, dry surfaces:
- HEPA vacuuming of dust and debris
- Cleaning mold-affected wood with anti-microbial solutions
- Removal or replacement of damaged insulation
- Sanding or minor wood preparation for adhesion
Surface prep ensures the coating bonds properly.
Step 4: Encapsulant Application
Professionals apply coatings using:
- Brushes or rollers for wood and rafters
- Sprayers for hard-to-reach areas
- Multiple thin coats rather than one thick layer
The encapsulant forms a barrier layer that reduces airborne spores and surface moisture absorption.
Step 5: Air Quality Control
During and after application:
- HEPA air scrubbers maintain clean air
- Containment barriers prevent spores from spreading to living areas
- Airflow is optimized to allow coatings to cure under controlled humidity
Step 6: Post-Application Monitoring
After encapsulation:
- Moisture levels are rechecked
- Coating adhesion and coverage are verified
- HVAC and attic ventilation are monitored to prevent new moisture accumulation
Regular follow-up ensures long-term protection.
Long-Term Protection Strategies
Encapsulation alone is not sufficient. Homeowners should implement complementary strategies:
1. Maintain Proper Ventilation
- Ensure ridge and soffit vents are unobstructed
- Install attic fans if necessary to circulate air
- Monitor for stagnant or warm pockets where moisture can condense
2. HVAC Maintenance
- Insulate ducts running through attics
- Repair leaks or condensation points
- Schedule regular professional HVAC inspections
3. Roof and Exterior Maintenance
- Inspect and repair shingles or flashing after storms
- Check gutters and downspouts for proper drainage
- Seal gaps around skylights or vents
4. Humidity Monitoring
- Use hygrometers to monitor attic RH (relative humidity)
- Deploy small dehumidifiers if seasonal humidity spikes occur
5. Periodic Attic Inspections
- Visual inspections 1–2 times per year
- Post-storm inspections after heavy rainfall
- Early detection of moisture problems prevents encapsulation failure
Benefits of Professional Mold Encapsulation in Sanford Attics
When done correctly, professional encapsulation:
- Reduces airborne spores
- Protects wood and other surfaces
- Extends the life of attic materials
- Prevents costly recurring mold issues
- Improves indoor air quality
Local professionals, such as Inspections and More FL, understand Sanford’s climate, construction styles, and seasonal storm patterns, ensuring effective long-term solutions.
Warning Signs Encapsulation May Be Needed
Homeowners should consider attic encapsulation if they notice:
- Musty odors persisting after mold removal
- Visible staining on rafters or decking
- Previous mold issues that returned quickly
- HVAC duct condensation contributing to moisture
Conclusion
Mold encapsulation in Sanford attics is a powerful long-term protection strategy when combined with proper remediation, moisture management, and ventilation improvements. By following structured steps—from inspection and moisture correction to surface preparation and coating—homeowners can maintain a dry, safe attic environment year-round.
Regular monitoring, maintenance of ventilation systems, and addressing storm-related water intrusion are key to preventing future mold problems. With professional guidance, attic encapsulation not only contains residual mold but also protects the home’s structural integrity and indoor air quality for years to come.