Moisture Detection in Merritt Island During Extreme Humidity: A Step-by-Step Explanation
Extreme humidity on Merritt Island isn’t a rare event — it’s basically a season (sometimes it feels like a personality trait). Between the Banana River, Sykes Creek, and the Indian River Lagoon, the air stays loaded with moisture. And when humidity spikes, homes don’t just feel sticky — they can start absorbing moisture in hidden places.
That’s why moisture detection matters during extreme humidity. It helps confirm whether your home is simply uncomfortable… or whether moisture is actively building inside walls, flooring, attics, crawl spaces, or HVAC systems.
Step 1: Confirm the Problem Is More Than “Florida Being Florida”
Professionals start by understanding what you’re noticing:
- Does the home feel damp even with AC running?
- Is the musty smell stronger in certain rooms?
- Is there recent storm activity or a known leak?
- Are floors, baseboards, or walls showing subtle changes?
This step matters because extreme humidity can mimic leak symptoms, and leak symptoms can look like “normal humidity.” The goal is to separate comfort issues from structural moisture issues.
Step 2: Identify High-Risk Zones First
On Merritt Island, certain areas are repeat offenders during humidity spikes. Pros prioritize:
- Exterior-facing walls (especially shaded sides)
- Slab edges and perimeter rooms
- Bathrooms and laundry rooms
- Kitchens (under sinks, behind appliances)
- Attics (roof decking and insulation)
- Crawl spaces (if the home is raised)
- HVAC closets, returns, and duct runs
Local coastal homes often have moisture problems that start at the edges: slab perimeter, wall bases, and crawl space boundaries.
Step 3: Measure Indoor Humidity (RH) and Temperature
Before touching walls or floors, professionals measure the indoor environment:
- Relative humidity (RH)
- Temperature
- Dew point (important in coastal zones)
Why this matters:
When dew point is high, moisture can condense on cooler surfaces — like ductwork, supply vents, or even inside walls. Merritt Island humidity can push dew point into a range where condensation becomes easy.
This step helps determine whether the home’s air conditions are capable of creating moisture problems even without leaks.
Step 4: Perform a Visual Inspection for Moisture Clues
Now comes the targeted visual scan — not just “look around,” but looking for patterns like:
- Bubbling paint or peeling texture
- Discolored baseboards
- Dark grout lines near exterior walls
- Swollen trim or soft drywall corners
- Rust on metal fasteners in attics
- Damp insulation patches
In extreme humidity, subtle signs matter. A tiny clue in one room can lead to a hidden moisture pocket elsewhere.
Step 5: Use Moisture Meters on Walls, Flooring, and Framing
Professionals use moisture meters to get real data — because your hand can’t measure moisture content.
They test:
- Drywall near baseboards (common absorption zone)
- Wood trim and door frames
- Subfloors (especially under hardwood or laminate)
- Closet walls (low airflow = higher humidity effects)
- Attic framing or roof decking if accessible
This step tells them:
- Is moisture elevated compared to baseline?
- Is it localized (possible leak) or widespread (humidity/ventilation issue)?
- Is moisture increasing toward exterior walls (common in coastal homes)?
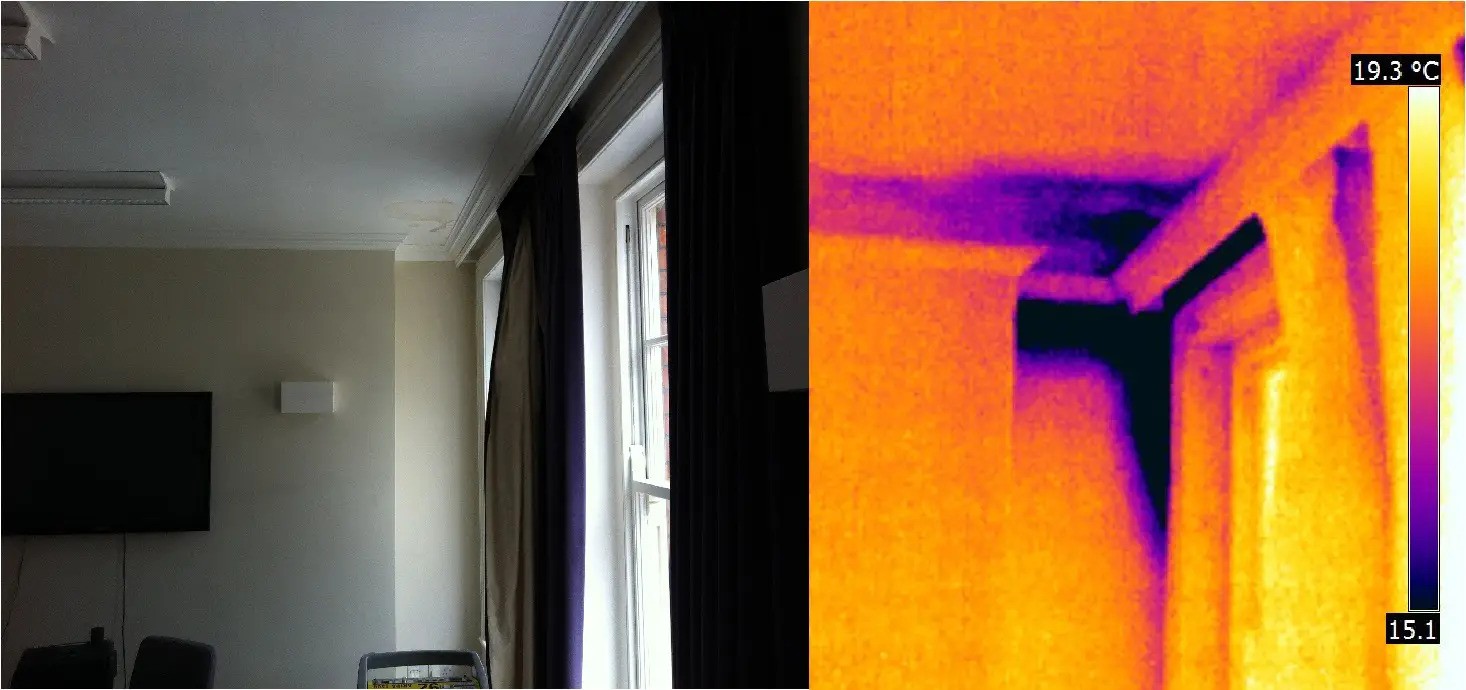
Step 6: Thermal Imaging to Locate Hidden Moisture Patterns
Thermal imaging is extremely useful during extreme humidity because it helps identify areas that are cooler or holding moisture — even when the surface looks normal.
Thermal scans may reveal:
- Cooler strips along wall bases (slab-edge moisture)
- Damp insulation inside exterior walls
- Condensation zones near duct runs
- Moisture behind bathroom walls
- Wet spots around roof penetrations
Important: thermal imaging shows temperature differences, not water directly — so professionals use it to find where to test, then confirm with moisture meters.
Step 7: Inspect Attic Conditions (A Big One in Merritt Island)
During extreme humidity, attics can quietly become moisture factories.
Professionals check for:
- Condensation on roof decking
- Damp insulation (especially near soffits)
- Poor ventilation patterns
- Duct sweating or wet duct insulation
- Bathroom fan ducts dumping moist air into the attic
If attic humidity is high, that moisture can impact the entire home’s air balance — and it can also trigger mold growth on decking and trusses.
Step 8: Evaluate Crawl Spaces or Under-Home Moisture (If Applicable)
Many Merritt Island homes have crawl spaces or raised sections.
Professionals look for:
- Damp soil or standing water
- High humidity under the home
- Mold on joists or subfloor
- Missing or damaged vapor barriers
- Signs of “stack effect” (air rising from below into living space)
Extreme humidity plus ground moisture is a common combination on the island. Crawl spaces can stay damp long after the outdoor air feels “normal.”
Step 9: Check the HVAC System for Moisture Contribution
In extreme humidity, the HVAC system can either help… or quietly make things worse.
Professionals inspect:
- Air handler drain lines and pans
- Return air leaks pulling humid air in
- Duct insulation condition (tears = sweating)
- Supply boots sweating near ceilings
- HVAC closet humidity levels
A small return leak in a humid climate can raise indoor moisture dramatically.
Step 10: Identify the Cause and Recommend a Targeted Fix
After measurements and mapping, professionals typically categorize the issue into one (or a mix) of these:
- Humidity/ventilation imbalance (common on Merritt Island)
- Condensation issue (dew point + cold surfaces)
- Hidden leak (plumbing, roof penetration, window intrusion)
- Ground moisture influence (crawl space or slab-edge migration)
- HVAC moisture source (drain issues, duct sweating, return leaks)
The fix depends on the category. Moisture detection tells you what you’re dealing with so you don’t waste money guessing.
A local team like Inspections and More FL (familiar with Merritt Island’s lagoon-side humidity patterns) typically focuses on pinpointing the moisture source first, then recommending the smallest effective solution.
What Homeowners Can Do Immediately During Extreme Humidity
While you’re waiting on a professional evaluation, these practical steps help:
- Keep indoor RH as steady as possible (don’t swing temps up and down)
- Use bathroom fans during showers and vent them properly
- Avoid drying laundry indoors
- Keep closet doors slightly open to improve airflow
- Check AC drain line for backups (common in humid months)
- Look for musty zones and note where they’re strongest (helps detection)
A Practical Takeaway for Merritt Island Homeowners
During extreme humidity, moisture problems on Merritt Island can be sneaky. The home can feel damp for “normal coastal reasons” — or because moisture is building in hidden structural zones.
A step-by-step professional moisture detection process protects your property by:
- Confirming whether materials are absorbing moisture
- Locating hidden damp areas before mold develops
- Identifying whether the source is humidity, condensation, leaks, or ground moisture
- Preventing repeated damage and unnecessary repairs
In a place surrounded by water, moisture detection isn’t just a one-time service. It’s smart home maintenance.